What is Git & Github?
Git commands you should know with a FREE cheat sheet at the end!
TECH NEWBIESTECHNICAL LEARNING
4/29/20245 min read


I’ll be honest with you, Git and git hub used to scare me. I had a fear that I would use the wrong command and all the work that everyone was working on would just disappear FOREVER. Or that there would be so many merge conflicts, that it would render the application useless. What I realised that this irrational fear came from a lack of understanding of what Git actually was. As a version control tool, the very essence of git is to keep a record of any changes to your application - meaning the state before your potential 'mess up' can be restored 🥳.
Before we look at useful commands, let's take a deeper look at what git actually is.
Git is a tool, often used by both individuals and companies to manage contributions to coding projects.
It allows multiple developers to work on a project simultaneously and independently while keeping track of all changes made to the codebase. It provides features such as branching, merging, and history tracking, which are essential for collaboration and code management.
GitHub, on the other hand, is a web-based platform that provides hosting for Git repositories and offers additional features for collaboration, code reviews, and project management. It allows developers to store their Git repositories remotely (accessible from the web), making it easier to share code with others and collaborate on projects.
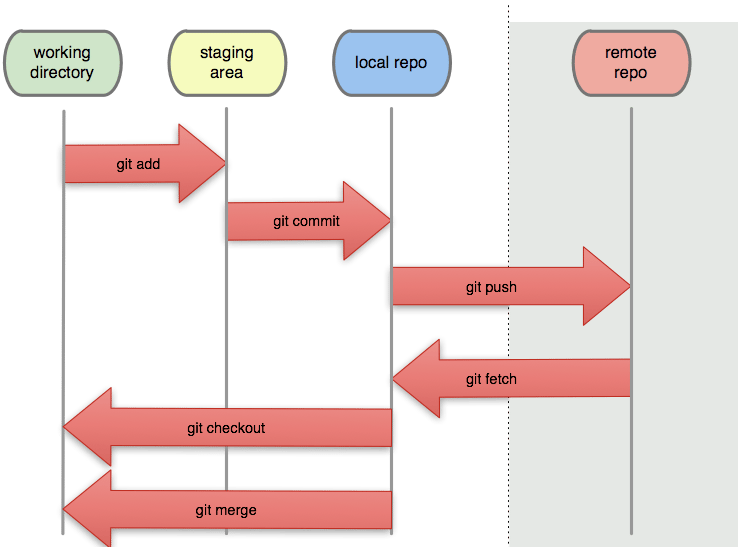
There are 4 main 'areas' of git you need to be aware of:
Working Directory: This is where you do all your work: creating, modifying, and deleting files. The working directory represents the current state of your project's files on your local machine. When you make changes to files in your working directory, Git recognises them as modifications.
Staging Area: The staging area is an intermediate step between your working directory and the repository. It's a place where you can prepare changes before committing them to the repository. When you stage changes using git add, you're preparing them to be included in the next commit. Files in the staging area are considered "ready" to be committed.
Local Repository: This is where Git permanently stores the committed changes. When you commit changes using git commit, Git takes a snapshot of the files in the staging area and stores it in the local repository. The local repository contains the complete history of your project, including all committed changes and their metadata.
Remote Repository: This is a version of your repository that's hosted on a remote server, such as GitHub, GitLab, or Bitbucket. Remote repositories allow multiple developers to collaborate on a project by sharing their changes with each other. You can push your local commits to the remote repository using git push, and you can fetch changes from the remote repository using git fetch or git pull.
What Commands Should I Know?
Many IDEs come with a handy built-in Git interface where you can simply click buttons instead of typing out commands in the terminal. While this can be convenient, getting comfortable with terminal commands has its perks. It's often faster, and since they work across all IDEs, you won't find yourself searching for the right buttons every time you switch environments.
Let's use a workflow scenario to go through some key commands:
You have picked up a ticket [a coding task] involving adding a new feature to a pre-existing codebase. You need to clone this repo [copy the folder] so you have a copy on your local machine. You get the url from GitHub and in your terminal, run the command - git clone <repo url>: not only does it download all the files, but also the history from the remote repository and sets up a local repository that is linked to the remote.
You want to work on your feature separately from the master branch (main workflow) so the master branch maintains stability. you make a new branch using the command git branch <new branch name> and you change into the branch by executing git checkout <new branch name>
You get to work on implementing this new feature.
It is now the end of the day, you have been working on some changes but are not quite finished. You decide to add all the changed files to the staging area so the changes are ready for your next commit by using the command - git add .
However, you realise that theres a bug in one of the files. You don't want it in your staging area so you use the command - git reset HEAD <file name> to pull it back. You’ll correct it tomorrow. You commit the rest of the files (take a snapshot which sits in the local repo) using the command git commit -m "commit message": and add a useful message to summarize the changes being committed. A good commit message is concise, and clear.
It’s the next day and you're colleague said they added some code to your branch and have pushed their changes to the remote repo. You decide to check what changes have been made using the git fetch command, and then you pull it to your working directory using the command git pull. You've finished debugging the file from yesterday. You add that single file to the staging area using the command git add <filename>.
You want to get a reminder of the current state of the working directory and staging area. you run the command git status : This command displays information such as which files have been modified, which files are staged for the next commit, and which files are untracked.
You are now ready to commit the final changes from your working directory to the local repo. you use the command - git commit -m "commit message": as done previously.
You have now finished implementing your feature and you push the changes up to the remote repo using the git push command
As a new developer, knowing these commands have been really useful in my daily activities. Practice is most important so I would suggest downloading this FREE git cheat sheet and using git/github as a version control software in your next personal project. Let me know how it goes by sending me a message at contact@ruthfultech.com
Check out the previous post on:
What to expect 6 months into your new developer role 👉🏾 Click Me!
Happy Coding!
Ruth


Why are there so many areas? Why can't I just save my work, like saving a Word document and send it to the remote repo when done, like sending a document by email? When working on applications, logical commits are important. You may have worked on multiple files at once but they are unrelated. If you commit them together, it will be hard for someone to track the logical flow of progression of your application. Overall, having multiple areas makes the project's history easier to understand and thus collaboration more effective.